Hello!

Welcome to 'One year to go...'! This is my story of our trip up the aisle starting with all the planning and a year to go!

Thursday, 24 March 2011

Cutting the cost but not the quality...

As I mentioned in previous posts, with H2B about to finish his final year of uni, we are getting married on a budget. And I think even if he was in full time work I still wouldn't want to be spending much more than we are on the Big Day. We would both much rather put that sort of money towards a house deposit.

So today's post is about stationary on a budget or rather making your own stationary. We're quite lucky in that I've always been 'arty farty' and 'creative' all through school and it's a hobby I've continued with by making cards & scrapbooking so I really am in my element at the moment with designing and creating our very own wedding stationary!! : )

I'm going to share with you exactly how much we've spent on every aspect of our wedding stationary and the suppliers we've used. And I'm going to treat you all to a sneaky peak at what I've created so far to show you just how much you can do with a relatively small amount of money!


The Costs...
Star Charms x 800                              £6.18
Silver/black ribbon x 30m                  £2.99
Black 5mm 0rganza ribbon x 60m     £2.58
Silver 25mm ribbon x 10m                 £2.38
Large star charms x 75                      £1.99
All of our ribbons & charms came from ebay - some suppliers in the UK and some from China. Admittedly they take a little bit longer to arrive from China but the money you save is worth the wait!

Black A4 card x 200                           £19.00
Silver A4 pearl paper x 100               £7.00
White card x 100                                FREE!
Pearl A4 paper for inserts                £27.81
Again, our black card & silver came from UK suppliers on ebay, the pearl paper for our inserts came from craft creations and the white A4 card came from H2B's mum (a retired teacher who was clearing out her cupboards at school ; ) handy!)

Order of Service blanks x 50            £11.60
Menu blanks x 15                              £2.00
Thank You blanks x 50                     £5.60
Place card blanks x 50                      £3.60
Invite blanks x 70                              £23.01
Thank You envelopes                        £3.20
Invite envelopes                                £5.90
Wording/star peel offs                      £15.61
All of the above came from Craft Creations and included all the little silver star stickers, the 'Order of Service', 'Wedding Invitation', 'Evening Invitation', 'Menu', 'Save the Date' and 'Thank You' wording stickers.

Perhaps the biggest 'extravagance' were the car photos, we needed LOTS and these cost us £40.00 in total. The 'Save the Date' lollipops came from a sweet shop on ebay and cost £6.99 for 50.

All in, our wedding stationary has cost us £187.44!

And this is what I've designed and created (with a bit of help from the other half!)...


My other half is car mad (currently finishing his degree in Motorsport Engineering) so it only seemed appropriate to use the car theme for our stationary. These are the only range of cards etc I've made that I've actually really loved! What do you think?

I've also made a lot of the decorations for our reception too; the bunting is to go along the front of the top table, our initials are to go on the top table...
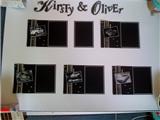


We've carried our colour theme of black, white & silver stars right through our stationary & decorations and also continued the car theme through to our tables.

Our tables have all been named after retro film cars...I agreed as long as I could have 'Herbie' - I love old VW's! The table planner isn't finished yet...waiting for a frame to arrive and want to add some more bits to it - will post another pic once it's complete.

So there you have it, our range of 'budget' stationary! Making your own really is easy and doesn't have to cost a fortune. And, perhaps the best bit of all, if you do it together it's actually good fun!

Would love to hear any comments you have! xx

Saturday, 19 March 2011

DIY Flowergirl Jewellery...

So...

I'd found and bought the perfect flowergirl dress with co-ordinating jacket, wings and wand, all I needed now was some jewellery.

In my head I had a clear idea of what I was looking for (story of my life lol) and I started looking before last Christmas thinking that Monsoon etc would stock something with stars on for kids. My hunt has continued until now...

After seeing a few of my tweeting friends have a go at making their  own jewellery I thought I'd do the same. I'm really pleased with the results and below you can see exactly how easy it was to make with my tutorial...

Flowergirl matching bracelet & necklace...
I first selected all of my supplies from a great haberdashery section in our local Fred Winter's - the little star beads came from ebay - total cost of supplies was just under £6.
I started by cutting a length of thread, I made sure this was twice as long as I actually needed so I had a bit to play with if it went wrong!! I then secured one half of the clasp to an end (I did this just by knotting so I apologise to the proper jewellery creators as this probably isn't the right way of doing it lol)


I then started to add my beads. I originally intended to go pearl, star, pearl, star alternately but it looked too much so simply unthreaded them and started again so it ended up looking like this...


I continued threading until reaching the desired length...


I then secured the last bead and attached the other half of the clasp. I then threaded the stray ends back through the beads to neaten off and also to add a bit more security to it. The finished article looks like this...


I then made a matching necklace in exactly the same way just making the length longer...


I now have a cute matching bracelet and necklace in exactly the design I wanted for my flowergirl!


I know it's not perfect by any stretch of the imagination but I'm quite proud of my first go and amazed at how easy it was to do. I also had help from this little man...
 This is Douglas...he likes to be where there's something happening...cat help is optional ; )
I'd love to know what you all think, good or bad so please feel free to leave a comment below.

xx


Wednesday, 16 March 2011

Tutu's fit for a princess...

I mentioned in an earlier post my quest to find the perfect flowergirl dress and now I'd like to introduce you all to the wonderfully talented lady behind that very dress...

From first seeing Miracle on 34th Street one Christmas years ago I have dreamt of getting married at Christmas and having a flowergirl dressed as a little fairy. My other half made the first bit of my dream come true by proposing last June and then booking our wedding for this December coming! The second part of my dream was made true by Michelle at Isobella's Tutu...

Michelle has very kindly allowed me to dedicate a post to her and her small business, her facebook page can be found here Isobella's Tutu 


I asked Michelle a few questions...how did Isobella's come about, what her inspirations are and what she enjoys most about her work?

"Well I've always been crafty ;0) I had a conversation with my friend about wanting to find something I could do at home whilst looking after my 3 children. She said that her daughter Gabriella wanted to wear an orange tutu for Halloween but my friend couldn't find a well made one anywhere. I said I'll have a go at making one. It came out really well so I made my friend one too. We thought of a name for my page Isobel(my daughter) ella (from Gabriella's name) and Isobella's Tutu was born. You can see the 1st tutus in the fan album. fairy photos ; )
I love flowers and fairies and pretty things so I guess my inspiration comes from there. Plus I love my customers to take part in creating something special for their fairy so actively encourage their suggestions.
I love seeing pictures of my Fairy tutu owners plus making and selling pretty things whilst still being able to look after my children at home. Plus making brides dreams come true ;0)"


Well, she's certainly made my and my flowergirl's dreams come true! If you'd like a sneaky peak at the beautiful tutu dress Michelle has created for me here you are...

What I've loved about working with Michelle is the level of detail she went into about what I wanted right down to the width of the ribbon around the waistband!
All the way through the design & creating process Michelle kept me regularly updated with comments and pictures which only added to the excitement! The finished creation arrived in a big box beautifully wrapped in tissue & ribbon with little silver charms...I was like a kid at Christmas opening it! : )

If you, like me, are looking for a beautiful fairy flowergirl dress then I can highly recommend Isobella's Tutu, both the service & quality are fantastic! I admit, I splashed out a bit more than I intended to get what I wanted but if you're on a tighter budget the tutu skirts are as adorable worn with a little top especially for a Summer wedding!

For a chance to meet with Michelle & chat about your design ideas pop along to this event in Bristol...
http://www.facebook.com/pages/Woman-South-West/104753406262435
It's going to be fantastic.
Michelle also has a sister page of Craftilicious which features five of her very talented friends...with products perfect for wedding thank you gifts!
http://www.facebook.com/craftilicious

I really cannot thank Michelle enough for the wonderful dress she has created for me...I keep sneaking a peak in the box! Hurry up December I want to get married!! : )

Michelle, thank you for helping to create my dream wedding! xx

Sunday, 27 February 2011

Saints v Tigers...marriage made in heaven?!

Now all the 'big' stuff is sorted for our special day I've turned my attention to the detail and have started to think about what else we can do or include that our guests will look at and go "that is so those two!"

For the last couple of weeks I've been scouring the wedding blogs and magazines for something that is "so us". And I've found it!
 (Photo from rockmywedding.com)

I fell in love with this idea as soon as I saw it! Now, our theme is black & white & silver stars so I was umming and ahhing about whether to stick to those colours or do something completely different. For a few days I've been thinking, "What colours mean something to us?"

And then it came to me, in a lightbulb moment, at 3:45am today!

H2B and I are both mad about rugby, him - Leicester Tigers, me - Northampton Saints which often leads to a bit of banter at weekends so...
The 'LOVE' letters on my side are going to be green & gold, alternated with black organza bows and a 'Saints' badge in the centre and on his side they're going to be red & green alternated with white organza bows and a 'Tigers' badge in the centre!

And the best bit of all...H2B loves the idea! : )

I love this photo too...
 (Photo from rockmywedding.com)

I have visions of us holding the green & gold - me smiling & him pulling a face and then vice versa lol! I love that we get to include our love of rugby in our big day, we're not ridiculously serious people so I want an element of fun to our day, and I'm hoping this will amuse our guests too. Mother-in-law thinks we should support the same team once we're married but I'm more than happy for the banter to continue! ; )

Saints v Tigers? Might not be a marriage made in heaven but it'll be one full of laughs and that suits me great! 

xx

Wednesday, 23 February 2011

Save the Date - Tutorial

I'm not going to lie, we are on a very tight budget for our wedding day of £5000. But I wanted to show you that you can make and have really special and exclusive things for your big day without them having to cost the earth! From the moment we got engaged the idea of designing and creating all of our wedding stationary was a very exciting one...almost as exciting as the hunt for THE dress!
We're very lucky in that this is one of my hobbies and something I absolutely love doing. From as far back as I can remember I've always been 'arty farty' and spent a lot of my spare time making things from paper or card.

After featuring on a blog by fellow bride to be Terri at http://www.mysticalmagicalweddings.com I thought I'd share with you just how I created our 'Save the date' cards...

We chose to send out 'Save the date's' because of getting married in December. We both knew that a lot of our friends & relatives would have family commitments or work parties around that time so we wanted to make sure they all knew well in advance and would then hopefully be able to share in our special day with us.

To make you will need:
  •  White A4 card (I used linen effect)
  •  A photo of your choice
  •  Black A4 card for mounting
  •  Black 'Stickles' glitter glue 
  •  Silver star stickers
  •  Black 'Save the Date' word peel offs
  •  Black 5mm organza ribbon
  •  Silver star charms
  •  Pink heart lollipops
Firstly, you need to cut the white card into quarters...

 I marked it out with a ruler and then used a guillotine for a really straight & smooth edge. You then need to shape the corners so you end up with a giant luggage tag shape and punch a hole in the middle of the shaped edge about 12mm in from the edge so you end up with something looking like this...
Next you will need to take your photo and stick it onto some black card to mount it and give the photo a bit of a border. We chose a black & white photo as it fitted in with our black & white theme, and a car as my other half is a bit of a petrolhead! We then photo shopped our names onto the picture...
 These photos appear on our wedding invitations, orders of service and also our menus to carry the theme right through our wedding stationary. You then need to stick this onto your large luggage tag. I stuck ours on at a jaunty angle as I felt they looked better like this and would sit better with the stars we added later.
 I then added the 'save the date' wording peel offs, these are from www.craftcreations.co.uk and come in a range of fonts and colours. I then added the silver stars (also from craft creations) and finally the little dots of black 'Stickles' glitter glue to create a cascading effect across the tag.
Following this I then took a 10 inch length of ribbon and added a small silver star charm (these came from ebay - £2.99 for 400!!)...
 I then threaded this through the hole in the luggage tag and looped it back through on itself to secure it and leave the star charm on the front of the card...
 We then decided to add heart shaped lollipops to them by simply tying them on, for a bit of fun and also to tie in with our theme for the reception where we're giving our guests haribo hearts & rings (only right given that other half is a member of the haribo fan club!) and the evening reception where we're having a candy store full of retro sweets (again these came from a sweet shop on ebay and cost us £3.99 for 50!)...
 And finally, using a silver pen, I wrote the basic details for our guests on the reverse...
 We also added a smaller black tag to ours which gave our guests the link to our wedding website along with the password they would need to access it. I've shown you how to make them the same as ours but it's entirely up to you and your choice of colours, themes etc.

In total these have cost us £12 to make 40. We also sat and made them together which was a really nice thing to do! 
I hope this can be of some help to some of you who are also getting married on a budget.
xx


Tuesday, 15 February 2011

Time for an update...

It's been a couple of weeks since I updated you all with wedding things so thought it about time I did so...

We've actually sorted out quite a lot of things over the last couple of weeks and I really feel like all of our hard work is starting to pay off and come together!

We went to our marriage preparation session on Saturday 12th Feb at the church where we will be getting married. I wasn't quite sure what to expect and how much use it would be to us but it was nice to meet all of the other couples that are getting married this year too.
It involved a few 'workshop' sessions around what we expect from marriage, how well we know each other and how we would deal with difficult situations that might arise in the future. A lot of these were quite timely for me and hubbytobe as he's coming up to the end of his final year at uni and starting to apply for jobs so things are going to be changing quite dramatically in a few months time so it was good to talk about those bits.
We also got to meet the lady that organises the flower displays and discussed some of our ideas with her. They also played a cd of some of the music we might like to choose for my entrance etc...the traditional bridal march made me cry so I think I'm sold already!
I feel we're closer than ever as a couple at the moment and soppy as it sounds, I really can't wait to become his wife.


I've also finalised the details and placed the order for my flowergirl Daisy's dress. I'm not sure who's more excited about it...me or Daisy?! ; )
Kate bought her into work to see me the other day and the conversation went...
Daisy: "Kirsty...when are you getting married?"
Me: "Not for a while yet Dais, we've got to wait until December! Would you like to see a picture of your dress, wings & wand?"
Daisy: (very excitedly nods)
so I show her all of the photos on my iphone of her fairy dress and accessories
Daisy: "Would I be able to keep my wand?"
at this point I melt as she's asked so politely and when I tell her she can keep all of it after the wedding she grins, puts her arms by her sides and shakes while going "ooohhh" lol hilarious! We have one VERY excited little flowergirl...she even told her mum the other night she was almost as excited about going to Disneyland as she was about our wedding!


We've also booked an appointment for the boys to try on their suits and order those...I can't wait for this I'm so looking forward to seeing them all dressed up...more tears from me I expect - I'm turning into a sentimental blubbing mess lately, there'll be no hope for me on the actual day!

We've started to think about hymns & readings and what we want in our wedding ceremony...both being rugby fans we're hoping the organist can play the 'World in Union' rugby world cup theme as we sign the register, I love this piece of music it always gives me goosebumps and brings a tear to my eye. The first dance song still evades us though : ( I think we have an official shortlist now it's just making the final decision and sticking with it!


It's been a long time coming but I'm properly enjoying the planning of it all now...roll on December! : )
xx